Remove Molding From Kitchen Cabinet Doors : Cabinet Doors Diy Cabinet Refacing Supplies Replacement Cabinet Doors Cabinet Doors Depot / Use mineral spirits with steel wool to clean the wood, according to family handyman.
Remove Molding From Kitchen Cabinet Doors : Cabinet Doors Diy Cabinet Refacing Supplies Replacement Cabinet Doors Cabinet Doors Depot / Use mineral spirits with steel wool to clean the wood, according to family handyman.. Using frameless cabinets means that a sub‐crown molding will always have to be screwed to the top of the cabinet case to attach the crown molding to. Now, wipe each cabinet door from top to bottom, paying extra attention to any trim or molding where dust and grime tend to accumulate. Use brad nailer to attach plywood along marked lines. It is okay if the colors don't match up perfectly at the wall because the molding will be on a different surface. Remember to use the correct mdf strip (3″ for the doors or 2″ for the drawers).
Then take a sharp chisel and gently tap around the perimiter of the molding, keeping the chisel flat against the door slab. Score the edges of the molding with a utility knife. It can prove difficult to remove an inner wood panel from a cabinet door, especially thicker hardwood panels, but if you don't want to buy a new door, try th. Let's assume a few scenarios: Once you open a little gap, switch to the stiff putty knife and work your way along.
Removing Some Kitchen Cabinets Rehanging One Young House Love from images.younghouselove.com Installing crown molding can be accomplished in a variety of ways depending on the application. Do on all doors, and sand and paint cabinets and then put the doors back. Sometimes it's the little things that make a big difference. Bleach and specific mold removers can be used.remove mold from wood cabinets so how to get rid of mold using these products? Insert the blade in between the trim and cabinet. Remove mold & mildew from furniture diy hack *stop the stink mold, mildew, musty, moth balls hack. Rinse the remaining glue residue from the surface with a sponge dampened with clean water. How to strip your plastic vinyl covered kitchen cupboard doors ready for painting.
Then take a sharp chisel and gently tap around the perimiter of the molding, keeping the chisel flat against the door slab.
It helps to break up the older layers of grime. Work from end to end, don't start in the center. After sanding to remove the old finish, the wood is actually a little darker and rougher where the molding was. Find a starting place near the end of a piece of molding. It is okay if the colors don't match up perfectly at the wall because the molding will be on a different surface. Use speed square + level and a pencil to mark lines where your molding will go on each door. You can use cloth, stiff bristle or paper towels instead. Don't forget to wipe handles and knobs, and the insides of. Once caulk is dry, sand and wipe clean. How to strip your plastic vinyl covered kitchen cupboard doors ready for painting. This will cut through any paint and caulking that is filling the cracks between the crown molding and the wall and ceiling. Sometimes it's the little things that make a big difference. Then take a sharp chisel and gently tap around the perimiter of the molding, keeping the chisel flat against the door slab.
Remove each door from the hinges. Apply your desired treatment to the inside after priming the interior walls. Make sure to immediately throw them away after the cleaning. Sometimes it's the little things that make a big difference. Remove molding and restain cabinet doors.
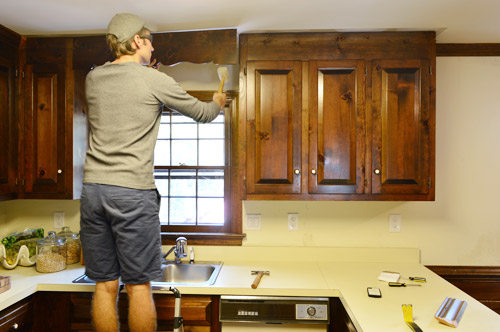
How To Safely Remove Kitchen Cabinets Hgtv from hgtvhome.sndimg.com Remove glue residue from the rear of the molding or the subsurface by brushing the surface with a layer of adhesive solvent. Insert the blade in between the trim and cabinet. Once caulk is dry, sand and wipe clean. Now, wipe each cabinet door from top to bottom, paying extra attention to any trim or molding where dust and grime tend to accumulate. Take all doors off the cabinets so you can work with them on a stable tabletop. Take a flat blade and run it around the perimiter of the molding, breaking the top coat seal. You can use cloth, stiff bristle or paper towels instead. I'm restaining some birch kitchen cabinet doors after removing some molding / profiling from the face of the doors.
Here's the trim when it's completely detached.
Step 1 use a screwdriver to remove all hardware from the cabinets from which formica will be removed. Use the tip of a sharp utility knife to carefully slice along the entire top and bottom edges of the crown molding where it meets the wall and the ceiling. It helps to break up the older layers of grime. Next, place the mdf strip flat on a sheet on the ground. Insert the flexible putty knife between the molding and the cabinet and try to gently pry the molding away. Use mineral spirits with steel wool to clean the wood, according to family handyman. Use speed square + level and a pencil to mark lines where your molding will go on each door. Cut mdf trim for sides of cabinet door. It easily pulled away from the cabinet so with a little more force the pieces ripped right off. Use a putty knife and a small prybar to pry the molding loose. Sand until smooth, and paint or stain as desired. How to make old vinyl plastic covered kitchen cupboards ( cupboard doors ). Spray all over where the mold is and use a brush rather than a cloth to clean the mold.
It helps to break up the older layers of grime. I simply wedged a flat head screwdriver between the trim and cabinet. I recommend removing the crown molding on the cabinets, making it more substantial and taking it all the way to the ceiling (just around the cabinets). Remember to use the correct mdf strip (3″ for the doors or 2″ for the drawers). I would also remove the cabinet doors over the fridge altogether to create some open shelving like the shelving over the microwaves.
Cleaning Kitchen Cabinets 9 Dos And Don Ts Bob Vila from empire-s3-production.bobvila.com Apply your desired treatment to the inside after priming the interior walls. It is okay if the colors don't match up perfectly at the wall because the molding will be on a different surface. Use a putty knife and a small prybar to pry the molding loose. Caulk all seams and nail holes. Adding crown molding to your kitchen cabinets weekend craft from www.weekendcraft.com taking off the doors and drawers, removing countertops, and detaching trim molding. Use old toothbrush to scrub the mold away from the cabinet. Score the edges of the molding with a utility knife. Once you open a little gap, switch to the stiff putty knife and work your way along.
To do so, remove cabinet doors and fill in holes with wood filler.
Cut the beadboard to fit inside the molding frame on each door face, adhering it in place. Then, rest the cabinet door, front side down, on top of the strip. Keep the cabinet door opened and let them dry for six to eight hours. Use a putty knife and a small prybar to pry the molding loose. Then take a sharp chisel and gently tap around the perimiter of the molding, keeping the chisel flat against the door slab. The molding should release from the slab if it's only nailed. Put molding strip on four sides with liquid nail/wood glue and paint. Sand until smooth, and paint or stain as desired. Installing crown molding can be accomplished in a variety of ways depending on the application. Here's the trim when it's completely detached. Sometimes it's the little things that make a big difference. Once you open a little gap, switch to the stiff putty knife and work your way along. How to clean wood cabinets just like for many of your other household cleaning problems, it's vinegar and water to the rescue.